Bird-less cow-less shortbread cookies

Friday, December 24, 2010

I had set my heart on baking vegan cookies for my coworkers's Christmas presents this year because one of them had become vegan this past year. It wasn't easy because most recipes called for butter or eggs, and I refused to shop for specialty ingredients in an expensive store. I managed to find a piped cookie recipe and decided to modify it with the intention of giving away adorable little bagfuls of pretty piped cookies. However, my modified recipe was too thick to pipe even after adding a ridiculous amount of soy milk so I rolled the dough into logs and sliced them instead. This is what I ended up making:

  • Bird-less cow-less shortbread cookies
  •  
  • 1 cshortening
  • 3/4 cicing sugar
  • 2 1/4 call-purpose flour
  • 1 1/2 Tbspvanilla extract
  • 1/2 csoy milk
  • Handfulalmonds, toasted
  •  
  • Cream shortening with sifted icing sugar and flour. Add vanilla and soy milk and mix well. Add almonds and mix.
  •  
  • Separate dough into 2-3 portions and place onto plastic wrap. Using wrap, shape dough into logs approximately 2" in diameter. Wrap up logs and freeze until hard.
  •  
  • Slice frozen logs approximately 1/4" thick and place 1" apart on lined cookie sheet. Bake at 350 degrees F for 22 minutes.
  •  
It was during my recent baking adventures that I started sifting my icing sugar regularly. This is because it settles and cakes into small clumps. If it is not sifted before using, the baked goods end up with the tiny clumps inside and look unprofessional as well as taste strange. Here is my bowl of sifted icing sugar:


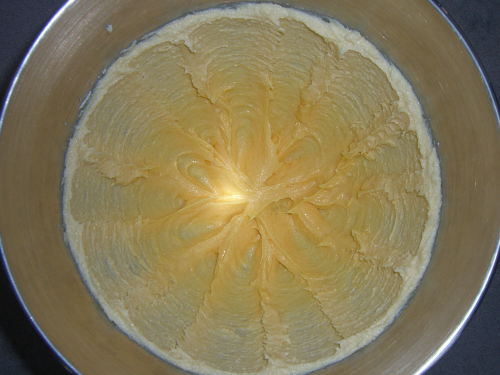
After mixing all the ingredients (pre-almonds), I realized the dough was much too thick to pipe. This would not change no matter how much soy milk I added to the recipe and I am not sure if this is because I substituted shortening for butter:


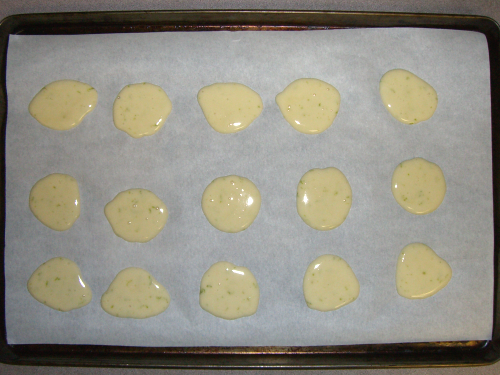
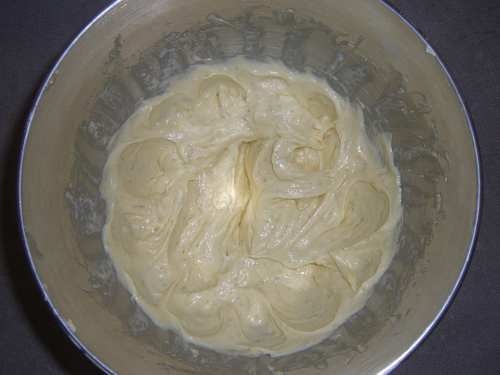
In any case, I realized that the dough consistency was suitable for log rolling so I added some toasted almonds and rolled everything up. Although I don't have pictures of the logs, here is the dough after adding almonds:


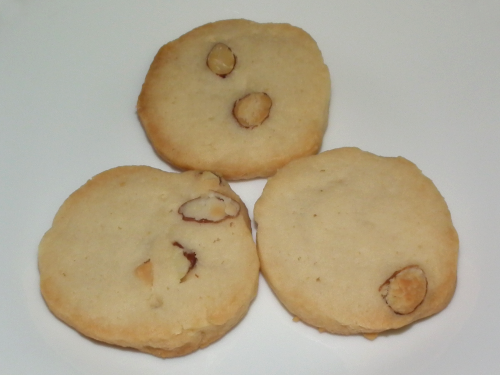
The dough must be completely frozen when slicing or the almonds move around and destroy the shape of the logs. Here is what the cookies looked like after baking:


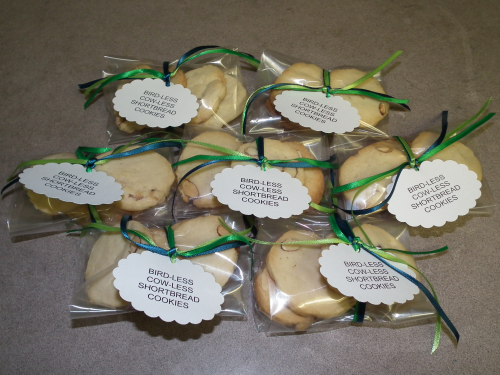
Although my presents looked nothing like I had originally envisioned, they were well received nonetheless. The cookies were just a tiny bit sweet and met my requirements for vegan ingredients. So now the last thing... Why are they called bird-less and cow-less? That's because my vegan coworker jokes that regular baked goods have birds and cows inside, referring to eggs and butter.

Vanilla cake with raspberry cream filling and lemon buttercream

Thursday, December 23, 2010

Remember the pretty bow cake I made? Here are some in-progress photos along with the recipes at the end!

I already had a lovely moist chocolate cake recipe so I set upon finding one for a basic vanilla cake. Along came another recipe that called for oil instead of butter and here was one of my two cakes:


I greased and flour the cake pans properly and the cake released without a hitch. Here's the proof via a perfectly smooth bottom:


Just like my chocolate cakes, I cut each cake into two layers and torted using the method I learned in the basic decorating class. Here is what my cake looked like after the first torting:


And here are two photos showing what I did... After piping a dam using lemon buttercream, I spread a thin layer of raspberry jam and then added a generous layer of raspberry cream filling:


Once I finished torting, I covered the entire cake with the remaining buttercream. Unlike the pure buttercream cakes, I didn't do a crumbcoat plus a top layer because no one would care about crumbs inside a fondant cake:


I took the cake to class along with my pre-flavoured and coloured fondant. We rolled out our fondant in class, covered our cakes, and started decorating. As I had decided to use the giant fondant bow I made in my first class, I pulled it out:


I glued it to the top of my cake using gum glue (made of fondant and water) and added some mini flower cutouts for a little something extra:


When I got home, I couldn't wait to give my cake a try so I removed the bow and sliced it up right away!


Here is a snapshot of the inside and the layers clearly show the cake, buttercream, jam, and cream filling:


What did I think of the cake? It was quite tasty, although I would cut the sugar in the cake recipe next time. Half would be about right since the jam and buttercream were already sweet, but the rest of the recipe is a definite keeper! Here are all the different parts of the cake except for the thin jam layer (which is just jam) and the fondant (which is Wilton fondant flavoured with Galloway's raspberry extract and dyed with Wilton burgundy icing colour):

  • Vanilla cake
  •  
  • 2 1/2 call-purpose flour
  • 2 1/4 tspbaking powder
  •  
  • 4eggs
  • 2 cgranulated sugar
  • 1 csoy milk
  • 3/4 coil
  • 1 Tbspvanilla extract
  •  
  • Sift flour and baking powder. Set aside flour mixture
  •  
  • Beat eggs and sugar for approximately 1 minute until slightly thickened. Add all liquids and mix well. Fold in flour mixture.
  •  
  • Pour into two 8" round pans and bake at 350 degrees F for 30-35 minutes.
  • Raspberry cream filling
  •  
  • 1/2 cwhipping cream
  • 1/2 craspberry jam
  •  
  • Whip cream until soft peaks form. Add jam and mix.
  • Lemon buttercream
  •  
  • 1 cshortening
  • 1 tspbutter flavour
  • 1 Tbsplemon extract
  • 2 Tbspsoy milk
  • 3 1/2 cicing sugar
  • 1 Tbspmeringue powder
  •  
  • Cream shortening, butter flavour, lemon extract, and soy milk. Add icing sugar and meringue powder. Mix until creamy.

Bow cakes and more

Sunday, December 5, 2010

The last of my fondant and gum paste classes was about applying everything we had learned to our final project. For this class, we brought a baked cake to cover and decorate. This post will be photos of all the cakes from my classmates and the next will be about my baking adventures.

So this is my cake, which incorporates a bow I made in my first class. I used a bit of extra fondant to make little flower cut outs:


This is Melissa Misuraca's cake, where the fondant was dyed Christmas red. The little balls at the bottom edge really give the whole thing a beautiful finish, but it was very time consuming:


This bow cake was made by Safiya Kamani and I like how she added strips of white fondant to make the cake look more like a present wrapped with ribbon.


Here is Sharon Young's Christmas red bow cake, which incorporates inlaid hearts and flowers along with a white fondant fringe at the bottom:


Of course, some cakes were neither red nor pink... This is Gloria Lau's sky blue cake with daisies and polka dots:


And lastly, Liz Keres, my neighbour during class, made this fantastic Christmas cake. Even the little figurine is made with fondant!


Of course, I can't write about my classes without thanking the instructor, Anne Armitage, who is extremely knowledgeable and helpful. I can't wait to take another decorating class with her!

Daisies and a bad mum

Saturday, December 4, 2010

My third fondant and gum paste class was about making more flowers and learning to cover a cake board with fondant. The latter was really boring so I only have a picture of the flowers:


We started with daisies and they were a breeze compared with the roses and carnations from the second class. We quickly moved onto mums, which I had trouble with because I had the daisy/mum cutters from the previous class kit and they didn't fit the mum base properly. That's why there's a bright white spot in the middle of the flower and the petals are the wrong size. The smaller peach coloured flower was when I had a little leftover fondant and wanted to start a daisy.

The last class will be about decorating an actual cake. My plan is to use up a bow I made in the first class so the cake will be pretty plain, but I plan to make a second complete cake soon so that one will incorporate flowers.

A rose without thorns

Sunday, November 21, 2010

It's photos galore today! I attended the second session of the Wilton fondant and gum paste class and made roses, carnations, and calla lilies! Here's a photo of my favourite of the three:


We learned how to make the rose base in the first class and had to bring some today. They are shaped like teardrops and are stuck on a stick to allow the petals to be threaded through. I made a couple using spaghetti, which can be seen in the photo below. My goal was to dye the fondant a soft peachy pink, but it ended up hot pink.


We also learned how to do carnation bases during the first class and had to bring some today. This is the carnation I finished in class:


Here is another photo showing two carnation bases plus the finished flower...


As for the calla lilies, they were the easiest to make, but are rather plain. I originally wanted to make them dark purple, but got tired of adding dye to my fondant so it ended up bright red. Here is one finished calla and four more resting on cones:


Lastly, I made three more roses when I got home because I had a little extra fondant left and didn't want to forget the technique. They are resting in candy cups that have been threaded through upside down styrofoam cups. The candy cups help the petals hold their shape as they dry and on the left is a little makeshift styrofoam stand for my flower bases. The teardrop ones are for roses and the little round ones are for chrysanthemums, which I will learn to make next week!

DIY coloured sprinkles

Sunday, November 14, 2010

Those in the know are already aware I had my first Wilton Gum Paste and Fondant class today... I will be sharing photos and thoughts as things progress, but in the meantime, I wanted to post this photo:


These are the plain, colourless Wilton sparkling sugars after I had dyed them with Golden Yellow and Pink. My professional baker friend Nicole gave me this idea years ago, but I didn't try it until last night because the class prep list said we had to bring yellow sparkling sugar to class.

So how did I do it? I dabbed a bit of gel dye inside a small zip bag with a toothpick, poured in some sugar, zipped up the bag, and shook. When I was happy with the colour, I poured the contents onto a flat container to airdry. Easy peasy!

Now, as for lessons learned, I figured out with the yellow that the longer you shake, the more intense the colour on the sugar, up to the actual shade of the dye. When I did the pink, I shook lightly for a few seconds so the colour is very light, but a couple pieces picked up the darker shade anyway. Also, the more dye that the sugar picks up, the longer it takes to dry. Lastly, I used a makeshift aluminimum foil dish instead of an actual plate to avoid accidental staining.

Lime cloud cookies

Sunday, November 7, 2010

I had a lime that desperately wanted to be grated and squeezed so I baked these cloud cookies recently. They are drop cookies with a very liquidy batter, and I chose the name "cloud cookies" because although the edges are a little crispy, the centre of the cookies are soft and pillowy. This is probably due to the eggs being beaten beforehand. Here is the recipe along with some photos:

  • Lime cloud cookies
  •  
  • 1 1/2 call-purpose flour
  • 1/2 tspbaking powder
  • 1/2 tspsalt
  •  
  • 3eggs
  • 1 1/4 cgranulated sugar
  • 1 Tbsplime juice
  • 1lime, grated
  •  
  • Sift flour, baking powder, and salt. Set flour mixture aside.
  •  
  • Beat eggs until fluffy. Add sugar and beat. Mix in lime juice and rind. Fold flour mixture into batter and mix.
  •  
  • Spoon onto a lined cookie sheet about 1/2" apart. Bake at 350 degrees F for 8 minutes.
This is the mixture before the flour mixture was added... It looks a little frothy due to the eggs:


This is after the flour mixture was added. It was very liquidy and had the consistency of white glue.


Then here it is on a cookie sheet:


And one more photo after baking... The cookies retain the same shape as its liquid pre-baked form and do not spread much.


I had originally hoped to pipe these cookies, but it clearly could not be done. One day when I try this recipe again (with a different flavour), I may try chilling the mixture before piping. Hopefully that will make a difference!

Honey cupcakes

Saturday, September 18, 2010

I was recently given a giant bottle of honey and I scratched my head for a while until it occurred to me that I could bake with it. Google revealed that honey cakes are a traditional Jewish holiday treat and there were raves for Canadian baker extraordinaire Marcy Goldman's Majestic and Moist Honey Cake recipe. I decided to give it a try until I realized I didn't have cloves, allspice, brown sugar, whiskey, or orange juice. Despite a number of substitutions and changes including halving the total sugar content, my hacked recipe turned out delicious and I would definitely do it again!

  • Honey cupcakes
  •  
  • 1/2 cdried blueberries
  • 1 bowlwater
  •  
  • 3 1/2 call-purpose flour
  • 1 Tbspbaking powder
  • 1 tspbaking soda
  • 1/2 tspsalt
  • 4 tspground cinnamon
  • 1 tspground nutmeg
  • 1/2 tspground ginger
  •  
  • 1 cgranulated sugar
  • 3eggs
  • 1 choney
  • 1 coil
  • 3/4 capple juice
  • 2 tspvanilla extract
  • 1 cstrong rooibos tea
  • Handfulsliced almonds
  •  
  • Soak dried blueberries in water until no longer hard, approximately an hour.
  •  
  • Sift flour, baking powder, baking soda, salt, cinnamon, nutmeg, and ginger. Set flour mixture aside.
  •  
  • Beat eggs with sugar.
  •  
  • Mix honey, oil, and juice well. Add to eggs and mix well. Mix in vanilla and tea. Fold in flour mixture and stir in drained blueberries. Spoon batter into medium cupcake papers until about 2/3 full and top with sliced almonds. Bake at 350 degrees F for 12 minutes.
As I was pulling my ingredients together in the beginning, I remembered I had a bag of dried, sweetened blueberries from Costco. By soaking them in water, they became juicy again without the wet mess associated with fresh blueberries. I find these dried blueberries too sweet on their own, but they were perfect in the cupcakes:


One of my substitutions was the rooibos tea for what was generically called "warm coffee or strong tea." I didn't have any orange pekoe and didn't want to use green or Earl Grey, so the only option was my pear flavoured rooibos. I didn't taste the pear in the final outcome and think any rooibos would have worked.

The batter was liquidy and some reviewers of the original recipe say their cake pans overran, but my batter only rose a little. My biggest surprise was how much batter I ended up with - there were 3 1/2 cups of flour after all. In total, I ended up with 36 medium cupcakes, 2 7.75x5.5 oval cakes (approximately 1" high and 18 minutes in the oven), and 12 mini cupcakes (10 minutes). This is what the finished medium-sized cupcakes looked like:


The cakes were super moist and tender, and the occasional blueberry added just the right amount of juicy sweetness:


Today is my brother Allan's birthday, but he couldn't try my baking because he has been living in Asia for several years. No matter, I stuck a candle in a cupcake and celebrated anyway!

Mini margarita cupcakes

Sunday, August 15, 2010

It's been a little over two months since my last post and the delay was due to a number of things including preparing to show my jewellery at the Salmon Festival Craft Fair in Steveston on July 1st. And after the fair, I had to inventorize and make some new pieces to replace the ones that sold.

But then my friend Tania announced a barbecue and I decided it was time to whip out my recipe for mini margarita cupcakes. They had always been crowd favourites and I knew they wouldn't let me down.

  • Mini margarita cupcakes
  •  
  • 1 call-purpose flour
  • 1 tspbaking powder
  • 1/2 tspsalt
  •  
  • 1/2 cunsalted butter
  • 3/4 cgranulated sugar
  • 3eggs, separated
  • 1 Tbspgrated lime zest (approximately one lime)
  • 2 Tbsptequila
  •  
  • 2 Tbsplime juice
  • 1 cicing sugar
  • 1 Tbsptequila
  • Pinchsanding sugar
  •  
  • Sift flour, baking powder, and salt. Set flour mixture aside.
  •  
  • Cream butter with sugar. Add egg yolks one at a time and mix. Add lime zest and tequila and mix.
  •  
  • Beat egg whites with a pinch of salt in a separate bowl until stiff but not dry. Fold flour mixture into batter. Gently fold egg whites into batter. Mix lightly.
  •  
  • Spoon batter into 55 mini cupcake papers until about 2/3 full and bake at 350 degrees F for 9 minutes.
  •  
  • For the glaze, mix lime juice, icing sugar, and tequila until smooth. Spoon onto cooled cupcakes and top with a little sanding sugar. Let glaze set.
The preparation was straight forward and this is what the batter looked like before adding the flour mixture and egg whites:


After the batter was fully prepared, it took on a much less yellow tone:


Here was my first tray filled with batter:


I prefer to use as little artificial colouring as possible so I chose not to add any green to the glaze. I also once added more grated lime zest for an extra zest, but these cupcakes didn't have any. In any case, the recipe above results in a lot of leftover glaze that can be used for other things and here was one of the finished cupcakes:

Chocolate crackle cookies

Friday, June 4, 2010

I came across a Martha Stewart recipe for chocolate crackles and thought they looked quite pretty so I decided to give them a try. However, I inadvertantly burned most of my chocolate and had to come up with a quick alternative since I only had a little bit of extra chocolate to spare. Here is my Plan B recipe along with photographs of what I ended up making (delicious!).

  • Chocolate crackle cookies
  •  
  • 1 1/2 ozdark baking chocolate
  • 2 tspinstant coffee
  • 1/2 cwater
  • 1/2 ccocoa powder
  •  
  • 1 1/2 call-purpose flour
  • 1/2 ccocoa powder
  • 2 tspbaking powder
  • 1/4 tspsalt
  •  
  • 1/2 cunsalted butter
  • 1 1/2 cbrown sugar
  • 2eggs
  • 1 tspvanilla extract
  • 1/3 cupsoy milk
  •  
  • 1 cgranulated sugar
  • 1/2 cicing sugar
  •  
  • Place chocolate in microwave and heat 20 seconds at a time until soft. Stir to melt and heat in 10 second increments if necessary. Set aside.
  •  
  • Stir instant coffee and 1/2 c cocoa powder in boiling water until smooth. Set aside.
  •  
  • Sift flour, remaining cocoa powder, baking powder, and salt.
  •  
  • Beat butter and brown sugar. Add eggs, vanilla, melted chocolate, and coffee/cocoa liquid and mix until smooth.
  •  
  • Alternately add flour mixture and milk to wet ingredients and mix.
  •  
  • Divide dough into four sections and refrigerate at least two hours.
  •  
  • Taking one section out at a time, roll into 1" balls, dip first into granulated sugar, then icing sugar. Place 3" apart on a lined cookie tray and bake at 350 degrees F for 14 minutes.
Beating the butter and brown sugar is easy and the mixture smelled heavenly. This is what it looks like:


Adding the eggs and vanilla changes the consistency considerably:


The addition of melted chocolate and coffee/cocoa liquid makes the mix very smooth and rich:


Alternatively adding the flour mixture and milk in thirds ensures the dough does not become too dry or liquid because either would make it hard mix properly. This is what the it looks like once prepared:


Due to the liquid content from my Plan B coffee/cocoa mix, the dough was quite liquid and I probably could have separated it into four bowls. Instead, I wrapped it up and left it in the fridge overnight. The next morning, I took a quarter of the dough out and had to work quickly because it warmed up in my hands.


The first couple of 1" balls were easy to roll, but the dough quickly melted in my hands and I had to wash regularly. Each quarter section of dough resulted in fifteen balls that I first rolled in granulated sugar and then icing sugar.


These are the exact same balls of dough once baked. The dough spreads so the balls must be kept far apart on the tray. I discovered that the granulated sugar melts and hardens, trapping the icing sugar on the surface. As well, the top of the cookie cracks as the dough spreads in the oven, resulting in a beautiful appearance:


The cookies are very light and I think it is due to the high liquid content. In fact, the inside looks a bit like cake, but is crispy instead of moist - I definitely recommend storing them in airtight containers between sheets of parchment paper to keep them crispy and to prevent the sugary outside from flaking off. I might reduce the brown sugar next time, but everyone who has tried the cookies like them just as they are!

Strawberry rose cupcakes

Friday, May 28, 2010

My very first post-class baking project involved making rose cupcakes again. Since the recipe and process were exactly the same as last time, the only pictures I took of the preparation stage were of the egg whites. Here they are after about five seconds of beating:


These are the same egg whites once they were stiff:


Since I no longer had to use the icing recipe required for the class, I experimented with fresh strawberries and came up with my own:

  • Strawberry icing
  •  
  • 1/3 cshortening
  • 2/3 tspbutter flavour
  • 6 Tbsppuréed strawberries
  • 1 1/2 cicing sugar
  • 1 tspmeringue powder
  •  
  • Cream shortening, butter flavour, and puréed strawberries. Add icing sugar and meringue powder. Mix until creamy, adjusting with additional puréed strawberries and/or icing sugar to achieve desired consistency.
I spooned the icing into a decorating bag and piped in a circular shape. Here is a finished cupcake sprinkled with sanding sugar:

About Aileen

  • LATEST TWEET: @heyelisse No, I was at VIFF earlier. And I've seen it before. Did you watch?
  • LATEST MOVIE: Renoir
  • LATEST CELEBRITY CRUSH: Rufus Sewell
  • LATEST SONG: Jasper Steverlinck - Life on Mars

About this blog

TRIAL BY SUGAR is an attempt to document the recipe hacks of an occasional kitchen elf.

My name is Aileen and although I am useless in the kitchen most of the time, I enjoy baking immensely. There is something magical about throwing together a mishmash of ingredients, adding heat, and ending up in something that is much more than the sum of its parts.

Sometimes I pick recipes that fit the items in my cupboard, other times it is the ones that come with the prettiest pictures or the most intriguing combination of ingredients. However, most of the time, an idea pops in my head and I just have to find a way to recreate it in baked form. No matter how the recipes are chosen, I seem to always need to bring them to life in a different way because I don't have all the ingredients or because something else in my cupboard desperately wants to join in the fun.

This means all of the recipes in this blog are not direct copies of someone else's work - they have all been modified slightly, a lot, or, in some cases, are completely mangled. They are faithfully recorded with accompanying commentary and photos, and are available for anyone to use!

   Blogger template by ourblogtemplates.com, but with some modifications of course.

Back to TOP