Bird-less cow-less shortbread cookies

Friday, December 24, 2010

I had set my heart on baking vegan cookies for my coworkers's Christmas presents this year because one of them had become vegan this past year. It wasn't easy because most recipes called for butter or eggs, and I refused to shop for specialty ingredients in an expensive store. I managed to find a piped cookie recipe and decided to modify it with the intention of giving away adorable little bagfuls of pretty piped cookies. However, my modified recipe was too thick to pipe even after adding a ridiculous amount of soy milk so I rolled the dough into logs and sliced them instead. This is what I ended up making:

  • Bird-less cow-less shortbread cookies
  •  
  • 1 cshortening
  • 3/4 cicing sugar
  • 2 1/4 call-purpose flour
  • 1 1/2 Tbspvanilla extract
  • 1/2 csoy milk
  • Handfulalmonds, toasted
  •  
  • Cream shortening with sifted icing sugar and flour. Add vanilla and soy milk and mix well. Add almonds and mix.
  •  
  • Separate dough into 2-3 portions and place onto plastic wrap. Using wrap, shape dough into logs approximately 2" in diameter. Wrap up logs and freeze until hard.
  •  
  • Slice frozen logs approximately 1/4" thick and place 1" apart on lined cookie sheet. Bake at 350 degrees F for 22 minutes.
  •  
It was during my recent baking adventures that I started sifting my icing sugar regularly. This is because it settles and cakes into small clumps. If it is not sifted before using, the baked goods end up with the tiny clumps inside and look unprofessional as well as taste strange. Here is my bowl of sifted icing sugar:


After mixing all the ingredients (pre-almonds), I realized the dough was much too thick to pipe. This would not change no matter how much soy milk I added to the recipe and I am not sure if this is because I substituted shortening for butter:


In any case, I realized that the dough consistency was suitable for log rolling so I added some toasted almonds and rolled everything up. Although I don't have pictures of the logs, here is the dough after adding almonds:
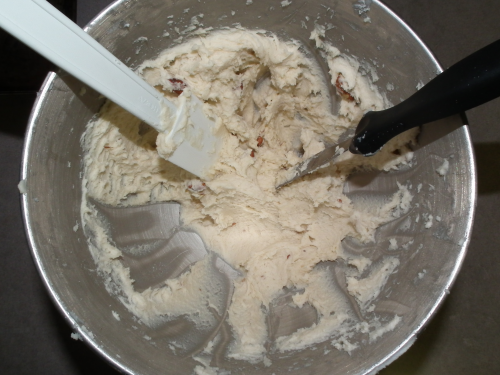

The dough must be completely frozen when slicing or the almonds move around and destroy the shape of the logs. Here is what the cookies looked like after baking:


Although my presents looked nothing like I had originally envisioned, they were well received nonetheless. The cookies were just a tiny bit sweet and met my requirements for vegan ingredients. So now the last thing... Why are they called bird-less and cow-less? That's because my vegan coworker jokes that regular baked goods have birds and cows inside, referring to eggs and butter.

Vanilla cake with raspberry cream filling and lemon buttercream

Thursday, December 23, 2010

Remember the pretty bow cake I made? Here are some in-progress photos along with the recipes at the end!

I already had a lovely moist chocolate cake recipe so I set upon finding one for a basic vanilla cake. Along came another recipe that called for oil instead of butter and here was one of my two cakes:


I greased and flour the cake pans properly and the cake released without a hitch. Here's the proof via a perfectly smooth bottom:


Just like my chocolate cakes, I cut each cake into two layers and torted using the method I learned in the basic decorating class. Here is what my cake looked like after the first torting:


And here are two photos showing what I did... After piping a dam using lemon buttercream, I spread a thin layer of raspberry jam and then added a generous layer of raspberry cream filling:


Once I finished torting, I covered the entire cake with the remaining buttercream. Unlike the pure buttercream cakes, I didn't do a crumbcoat plus a top layer because no one would care about crumbs inside a fondant cake:


I took the cake to class along with my pre-flavoured and coloured fondant. We rolled out our fondant in class, covered our cakes, and started decorating. As I had decided to use the giant fondant bow I made in my first class, I pulled it out:


I glued it to the top of my cake using gum glue (made of fondant and water) and added some mini flower cutouts for a little something extra:


When I got home, I couldn't wait to give my cake a try so I removed the bow and sliced it up right away!


Here is a snapshot of the inside and the layers clearly show the cake, buttercream, jam, and cream filling:


What did I think of the cake? It was quite tasty, although I would cut the sugar in the cake recipe next time. Half would be about right since the jam and buttercream were already sweet, but the rest of the recipe is a definite keeper! Here are all the different parts of the cake except for the thin jam layer (which is just jam) and the fondant (which is Wilton fondant flavoured with Galloway's raspberry extract and dyed with Wilton burgundy icing colour):

  • Vanilla cake
  •  
  • 2 1/2 call-purpose flour
  • 2 1/4 tspbaking powder
  •  
  • 4eggs
  • 2 cgranulated sugar
  • 1 csoy milk
  • 3/4 coil
  • 1 Tbspvanilla extract
  •  
  • Sift flour and baking powder. Set aside flour mixture
  •  
  • Beat eggs and sugar for approximately 1 minute until slightly thickened. Add all liquids and mix well. Fold in flour mixture.
  •  
  • Pour into two 8" round pans and bake at 350 degrees F for 30-35 minutes.
  • Raspberry cream filling
  •  
  • 1/2 cwhipping cream
  • 1/2 craspberry jam
  •  
  • Whip cream until soft peaks form. Add jam and mix.
  • Lemon buttercream
  •  
  • 1 cshortening
  • 1 tspbutter flavour
  • 1 Tbsplemon extract
  • 2 Tbspsoy milk
  • 3 1/2 cicing sugar
  • 1 Tbspmeringue powder
  •  
  • Cream shortening, butter flavour, lemon extract, and soy milk. Add icing sugar and meringue powder. Mix until creamy.

Bow cakes and more

Sunday, December 5, 2010

The last of my fondant and gum paste classes was about applying everything we had learned to our final project. For this class, we brought a baked cake to cover and decorate. This post will be photos of all the cakes from my classmates and the next will be about my baking adventures.

So this is my cake, which incorporates a bow I made in my first class. I used a bit of extra fondant to make little flower cut outs:


This is Melissa Misuraca's cake, where the fondant was dyed Christmas red. The little balls at the bottom edge really give the whole thing a beautiful finish, but it was very time consuming:


This bow cake was made by Safiya Kamani and I like how she added strips of white fondant to make the cake look more like a present wrapped with ribbon.


Here is Sharon Young's Christmas red bow cake, which incorporates inlaid hearts and flowers along with a white fondant fringe at the bottom:


Of course, some cakes were neither red nor pink... This is Gloria Lau's sky blue cake with daisies and polka dots:


And lastly, Liz Keres, my neighbour during class, made this fantastic Christmas cake. Even the little figurine is made with fondant!


Of course, I can't write about my classes without thanking the instructor, Anne Armitage, who is extremely knowledgeable and helpful. I can't wait to take another decorating class with her!

Daisies and a bad mum

Saturday, December 4, 2010

My third fondant and gum paste class was about making more flowers and learning to cover a cake board with fondant. The latter was really boring so I only have a picture of the flowers:


We started with daisies and they were a breeze compared with the roses and carnations from the second class. We quickly moved onto mums, which I had trouble with because I had the daisy/mum cutters from the previous class kit and they didn't fit the mum base properly. That's why there's a bright white spot in the middle of the flower and the petals are the wrong size. The smaller peach coloured flower was when I had a little leftover fondant and wanted to start a daisy.

The last class will be about decorating an actual cake. My plan is to use up a bow I made in the first class so the cake will be pretty plain, but I plan to make a second complete cake soon so that one will incorporate flowers.

About Aileen

  • LATEST TWEET: @heyelisse No, I was at VIFF earlier. And I've seen it before. Did you watch?
  • LATEST MOVIE: Renoir
  • LATEST CELEBRITY CRUSH: Rufus Sewell
  • LATEST SONG: Jasper Steverlinck - Life on Mars

About this blog

TRIAL BY SUGAR is an attempt to document the recipe hacks of an occasional kitchen elf.

My name is Aileen and although I am useless in the kitchen most of the time, I enjoy baking immensely. There is something magical about throwing together a mishmash of ingredients, adding heat, and ending up in something that is much more than the sum of its parts.

Sometimes I pick recipes that fit the items in my cupboard, other times it is the ones that come with the prettiest pictures or the most intriguing combination of ingredients. However, most of the time, an idea pops in my head and I just have to find a way to recreate it in baked form. No matter how the recipes are chosen, I seem to always need to bring them to life in a different way because I don't have all the ingredients or because something else in my cupboard desperately wants to join in the fun.

This means all of the recipes in this blog are not direct copies of someone else's work - they have all been modified slightly, a lot, or, in some cases, are completely mangled. They are faithfully recorded with accompanying commentary and photos, and are available for anyone to use!

   Blogger template by ourblogtemplates.com, but with some modifications of course.

Back to TOP